
Arduino led fun
Posted on 10 Dec 2011 | Back to Bitloom home
Lately I’ve bought an Arduino kit because I got interested by this platform, and above all because I was curious about experimenting with a technology capable of making the code I write on a laptop affect the environment where I actually live. Somebody calls it ubuquitous computing, others ambient computing or intelligence. To me, for the moment, it’s just an Arduino board with some wires and some electric components connected to my laptop.
In this post I’ll document my first experiment with this platform. This is useful also to keep track of what I did, because in order to do a new experiment I have to physically destroy the previous one.
The experiment consisted in lighting up a set of color leds using different patterns that can be selected (cycled-through) by using a button.
This is the electrical schema of what I built:
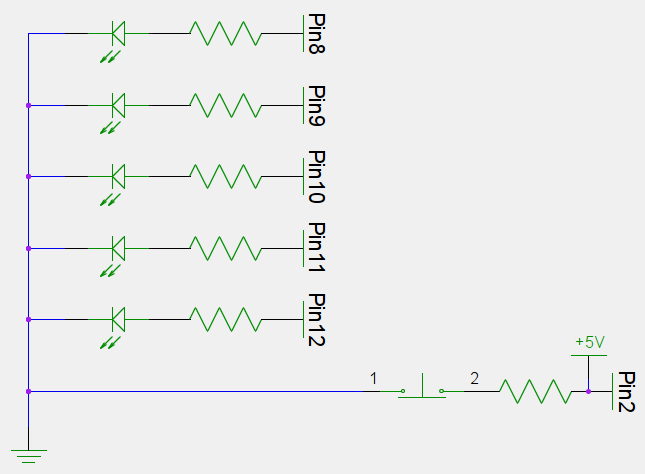
Each led is connected to an Arduino digital pin, which is set as OUTPUT. The resistors are used to soften the intensity of the led light, but they can also be removed (which will make leds emit a stronger light)
The button is connected to another digital pin which is set as INPUT for receiving the button signal when pressed.
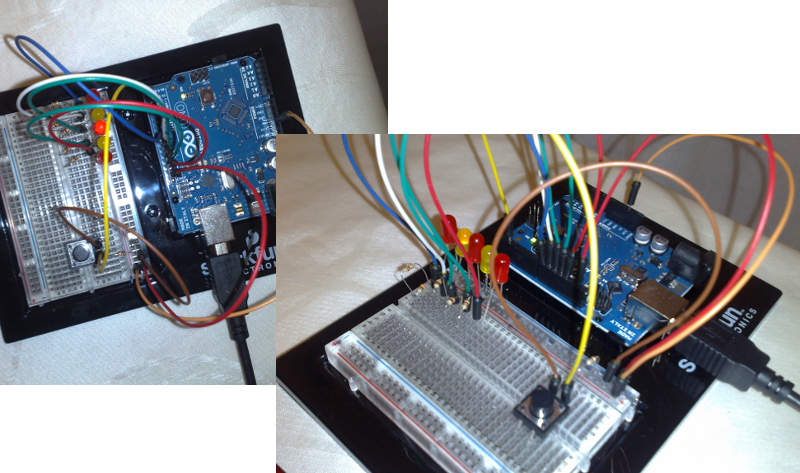
This circuit is realized by actually wiring components on a breadboard and to my Arduino board. This is a lot of fun (and sometimes pain) indeed, and the final result looks like this:
Once things are wired up correctly I had to write the actual code to make things work, i.e., make the leds light up.
My Arduino board has an Atmel ATMega328, an 8bit RISC processor with 32Kb of flash memory. I didn’t go that far writing code directly in assembly, but I used the Arduino IDE which, in turns, uses the gcc-avr compiler.
So basically the task boiled down to write some lines of C code, which look like the following:
/* Arduino Led Fun
 * Copyright (C) 2011 - Fabio Mancinelli <fm@fabiomancinelli.org>
 *
 * This library is free software; you can redistribute it and/or
 * modify it under the terms of the GNU Lesser General Public
 * License as published by the Free Software Foundation; either
 * version 2.1 of the License, or (at your option) any later version.
 *
 * This library is distributed in the hope that it will be useful,
 * but WITHOUT ANY WARRANTY; without even the implied warranty of
 * MERCHANTABILITY or FITNESS FOR A PARTICULAR PURPOSE.  See the GNU
 * Lesser General Public License for more details.
 *
 * You should have received a copy of the GNU Lesser General Public
 * License along with this library; if not, write to the Free Software
 * Foundation, Inc., 51 Franklin Street, Fifth Floor, Boston, MA  02110-1301  USA
 */
#define LEDS 5

/* This array of arrays contains the led configuration for the different patterns. */
unsigned int pattern_data[14][LEDS] = {
 { LOW, LOW, LOW, LOW, LOW },   //Off pattern
 /***/
 { HIGH, LOW, LOW, LOW, LOW },  //Sequence pattern step 1 of 5
 { LOW, HIGH, LOW, LOW, LOW },  //Sequence pattern step 2 of 5
 { LOW, LOW, HIGH, LOW, LOW },  //Sequence pattern step 3 of 5
 { LOW, LOW, LOW, HIGH, LOW },  //Sequence pattern step 4 of 5
 { LOW, LOW, LOW, LOW, HIGH },  //Sequence pattern step 5 of 5
 /***/
 { HIGH, LOW, HIGH, LOW, HIGH}, //Alternate pattern step 1 of 2
 { LOW, HIGH, LOW, HIGH, LOW},  //Alternate pattern step 2 of 2
 /***/
 { HIGH, LOW, LOW, LOW, HIGH},  //In pattern step 1 of 3
 { LOW, HIGH, LOW, HIGH, LOW},  //In pattern step 2 of 3
 { LOW, LOW, HIGH, LOW, LOW},   //In pattern step 3 of 3
 /***/
 { LOW, LOW, HIGH, LOW, LOW},   //Out pattern step 1 of 3
 { LOW, HIGH, LOW, HIGH, LOW},  //Out pattern step 2 of 3
 { HIGH, LOW, LOW, LOW, HIGH}   //Out pattern step 3 of 3
};

/* This array contains the start and end indexes for the led configuration
   described in the pattern_data array corresponding to a given pattern. */
unsigned int patterns[5][2] = {
  {0, 0},  // Start, end index for the Off pattern data
  {1, 5},  // Start, end index for the Sequence pattern data
  {6, 7},  // Start, end index for the Alternate pattern data
  {8, 10}, // Start, end index for the In pattern data
  {11, 13} // Start, end index for the Out pattern data
};

/* Pin configuration. */
const unsigned int button_pin = 2;
const unsigned int led_pins[LEDS] = {8, 9, 10, 11, 12};

unsigned int current_pattern = 0;

/* Delay to be waited before changing the pattern configuration. */
const unsigned int delay_length = 200;

/* Used to avoid to repeatedly change the state if the button is kept pressed */
unsigned int current_pattern_changed;

unsigned int counter;

/******************************************************************************/

void setup() {
  Serial.begin(9600);

  pinMode(button_pin, INPUT);

  for(int i = 0; i < LEDS; i++) {
    pinMode(led_pins[i], OUTPUT);
  }

  Serial.println("Arduino led fun initialized.");
}

/******************************************************************************/

void loop() {
  int button_state = digitalRead(button_pin);

  /* Check button state */
  if(button_state == LOW) {
    /* This checks prevents to change repeatedly the pattern if the button is
       pressed for a long time */
    if(current_pattern_changed == 0) {
      current_pattern = (current_pattern + 1) % (sizeof(patterns) / sizeof(patterns[0]));
    }

    current_pattern_changed = 1;
  }
  else {
    current_pattern_changed = 0;
  }

  /* Find the pattern start and end index in the pattern data */
  unsigned int pattern_start_index = patterns[current_pattern][0];
  unsigned int pattern_end_index = patterns[current_pattern][1];

  /* Compute how many steps the pattern has */
  unsigned int steps_in_current_pattern = pattern_end_index - pattern_start_index + 1;

  /* Find the current step based on the counter */
  unsigned int current_step = counter % steps_in_current_pattern;

  /* Get the led configuration for the current step */
  unsigned int *led_configuration = pattern_data[pattern_start_index + current_step];

  /* Write the led configuration for the current pattern step */
  for(int i = 0; i < LEDS; i++) {
    digitalWrite(led_pins[i], led_configuration[i]);
  }

  /* Next iteration */
  counter++;

  delay(delay_length);
}
This has been quite challenging… After a lot of years spent on programming with high level languages, I had to switch my brain back to the times where the only data structure available was the array.
I used the pattern_data array to define the led configurations for each step of a pattern. A pattern can be thought as an animation where, at each step, leds are lit up in a different way (configuration).
The pattern_data contains all the steps for all the patterns (in a high level language I would have created a Map from a pattern name to a List of LedConfigurations… but here we simply can’t. Not easily at least)
The pattern array is used to define where a pattern starts and ends. Basically it’s a multidimensional array where each element is, again, an array of two ints defining the start and end index in the pattern_data array. The length of the pattern array gives the number of patterns defined in the program (in this case 5)
So, for example, the first pattern pattern[0] starts at index 0, and ends at index 0. The led configuration for this step is “everything off”.
By having the start and end index it’s easy to compute the pattern length in steps. For example pattern[1] starts at index 1 and ends at index 5 for a total of 5 steps.
The main loop is straightforward.
I use the counter variable as a global clock for understanding which pattern step I have to render. By knowing how many steps a pattern is made of, a simple modulo operation will give us the current step index, and thus the corresponding led configuration. Then it’s just a matter of iterating on this configuration and set the corresponding pin values.
At each iteration I wait for an interval defined in the delay_length variable to slow things down a bit, otherwise the leds would be lit up and down too fast.
The if statement at the beginning of the loop function is used to avoid to continuously changing the pattern if the button is kept pressed. The current_pattern_changed variable is set to 1 the first time the pattern is changed. In this way the if block will not be executed on the next iterations if the button_state continues to be LOW, i.e., pressed.
When the button is released, then current_pattern_changed is reset to 0 making it possible to change the pattern the next time it is pressed.
The code should be easily extensible if you add more leds. It’s just a matter of changing the LED define, adding the missing elements to the pattern_data configurations, and declaring where the new leds are connected in the led_pins array.
That’s pretty much it. You can check this little video to look at how it actually works:
I liked a lot this experiment for two reasons. First it allowed me to play and learn more about very very low level components. Second, it made me write some code without using any abstraction. After years living on top of several layers of middlewares, frameworks, etc. it’s quite refreshing to talk to the bare metal directly.
You can find the source code on my account on GitHub. I will put there all the other experiments I will do in the future.